1. Place beef steak in freezer for 30 minutes. Then slice thinly.
2. Place rice in pot and cover with lots of water. Soak for 30 minutes then rinse. This makes it fluffy. Cook according to package directions.
3. Meanwhile heat oven to 425 F. Lay broccolini out on a baking tray. Splash with a little soy sauce, sesame oil (1-2 tsp. Each) salt and pepper. Toss. Then place in oven 15 minutes or slightly crispy.
4. Mix the sauce ingredients and set aside.
5. Once you slice the beef, heat pan with a little oil. Cook on high heat for just a minute or two. Once it’s cooked add the sauce in and just heat till bubbly like 30 seconds to 1 minute. Serve immediately over rice with broccolini.
Place beef steak in freezer for 30 minutes. Then slice thinly.
Place rice in pot and cover with lots of water. Soak for 30 minutes then rinse. This makes it fluffy. Cook according to package directions.
Meanwhile heat oven to 425 F. Lay broccolini out on a baking tray. Splash with a little soy sauce, sesame oil (1-2 tsp. Each) salt and pepper. Toss. Then place in oven 15 minutes or slightly crispy.
Mix the sauce ingredients and set aside.
Once you slice the beef, heat pan with a little oil. Cook on high heat for just a minute or two. Once it’s cooked add the sauce in and just heat till bubbly like 30 seconds to 1 minute. Serve immediately over rice with broccolini.
I made these while the epic storm Hilary was passing through Los Angeles. We were told to stay home.
So what better way to use my time than bake?
These cookies hit the comfort all-is-well spot.
I got this recipe from thebakerchick.com if you want the original.
Mrs. field’s M&M cookies
Ingredients (makes about 18 large cookies)
2 cups all purpose flour
1 1/4 teaspoons baking soda
1/4 teaspoon salt
3/4 cup (1 1/2 sticks) unsalted butter, room temperature
2/3 cup granulated white sugar
2/3 cup firmly packed light brown sugar
1 large egg, plus 1 yolk
1 1/2 teaspoons pure vanilla extract
1 cup M&M’s candies
Directions:
Preheat oven to 350F. Line two cookie sheets with parchment or Silicone baking liners. Set aside.
In a medium bowl- whisk together the flour, baking soda, and salt.
In a large bowl fitted with a paddle attachment- cream the butter and sugars on high until smooth and pale.
Add the egg, the yolk and then the vanilla- mixing thoroughly.
Mix in the dry ingredients until combined.
Use a cookie scoop to portion dough 2-3 inches apart on cookie sheet (mine yielded 1 1/2 inch sized rounds-they will spread significantly) I only put 6 with my red scooper on a tray since they spread so much
Bake for 10-12 minutes. Or until edges are set and slightly golden and set. Right away- press as many M&Ms as you want in the tops of the cookies.
Allow to cool for 5 minutes and then transfer to a wire rack.
I made myself this pasta during the recent storm in SoCal. They told us to stay home during storm Hilary because it was going to be epic. And then there was an earthquake.
So I needed a go-to recipe to hunker down with.
I wanted to make something simple from the pantry. And pasta is my go-to comfort food in times of crisis. This hit the spot.
It packs a lot of flavor, but so much flavor that some people don’t care for it, like my boyfriend.
So I just made it for myself while he ate leftover pizza.
Here’s the recipe for one. Hope it brings some comfort to you.
Notes:
I like using fresh cherry tomatoes but the classic recipe uses canned whole tomatoes squished with your hands
Pasta Puttanesca for One
Ingredients:
75g spaghetti (serving for one)
1 tablespoon olive oil
1 small garlic clove, sliced thin
1/2 teaspoon anchovy paste
1/4 teaspoon red pepper flakes (adjust to taste)
1/2 cup cherry tomatoes
8-10 pitted black olives, sliced
1 tablespoon capers, rinsed and drained
Instructions:
Cook the spaghetti according to the package instructions until al dente. Drain and set aside.
In a skillet, heat the olive oil over medium heat. Add the sliced garlic and sauté for about 1 minute until fragrant. Just golden brown.
Stir in the anchovy paste and red pepper flakes. Cook for another minute, stirring to combine.
Add the cherry tomatoes to the skillet. (Lower heat, it may splatter) Cook for about 3-4 minutes until they start to soften and release their juices.
Mix in the sliced olives and capers. Continue to cook for another 2-3 minutes, allowing the flavors to meld.
Toss the cooked pasta into the skillet with the tomato mixture. Gently combine everything to evenly coat the pasta with the sauce.
If you prefer, you can add a bit of the pasta cooking water to adjust the consistency of the sauce.
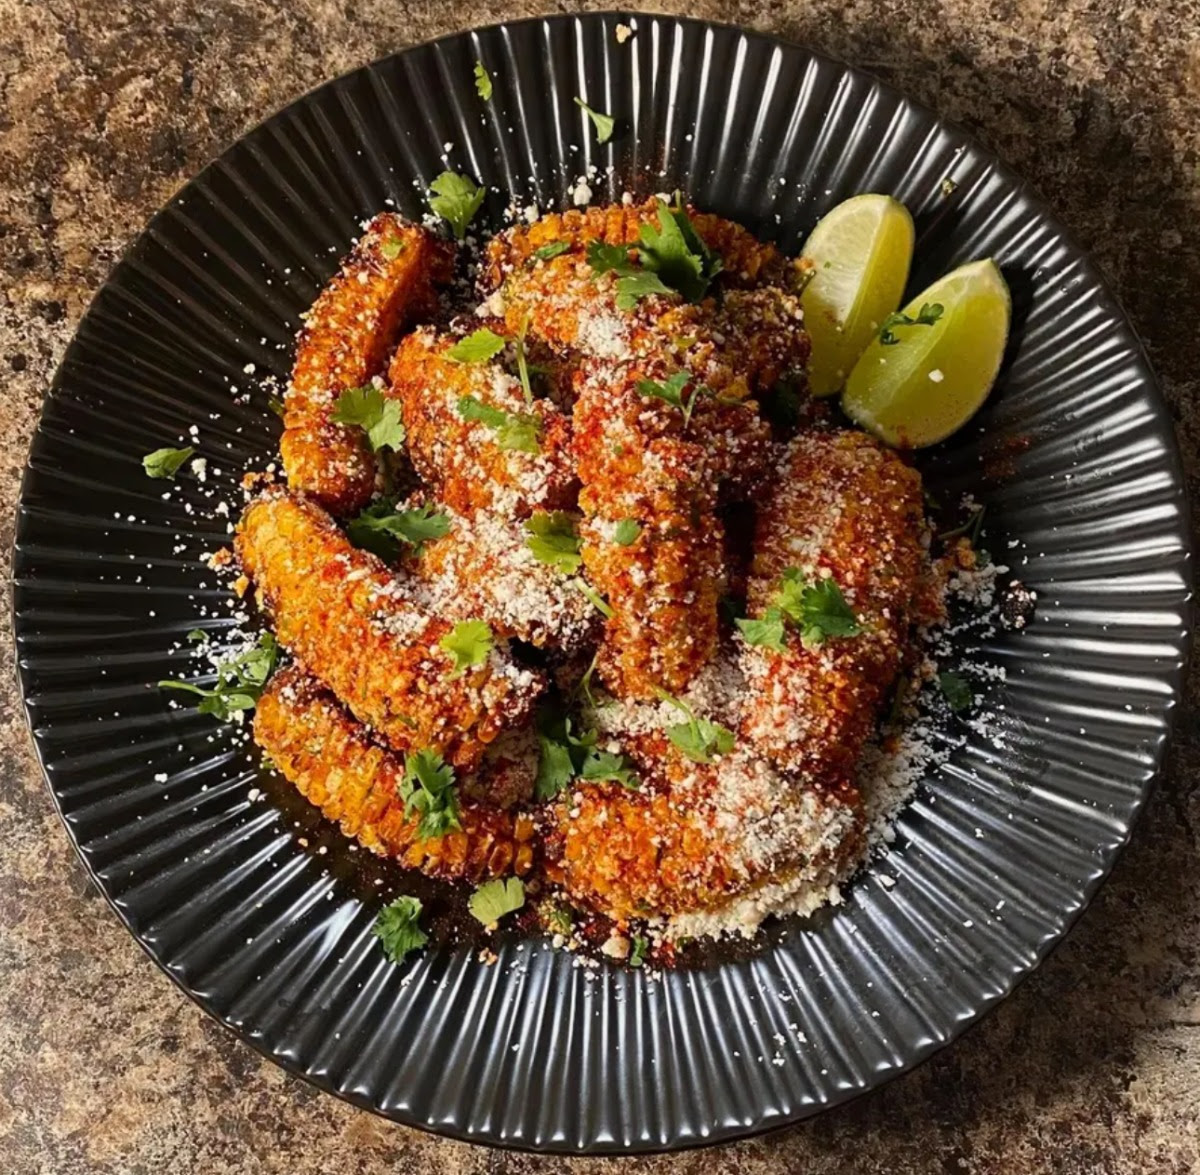
They’re delicious and fun to eat. They’re strips of corn on the cob that are brushed with seasoning and air-fried or baked.
Here’s what they look like when you’re done.
Let me show you how to make ’em!
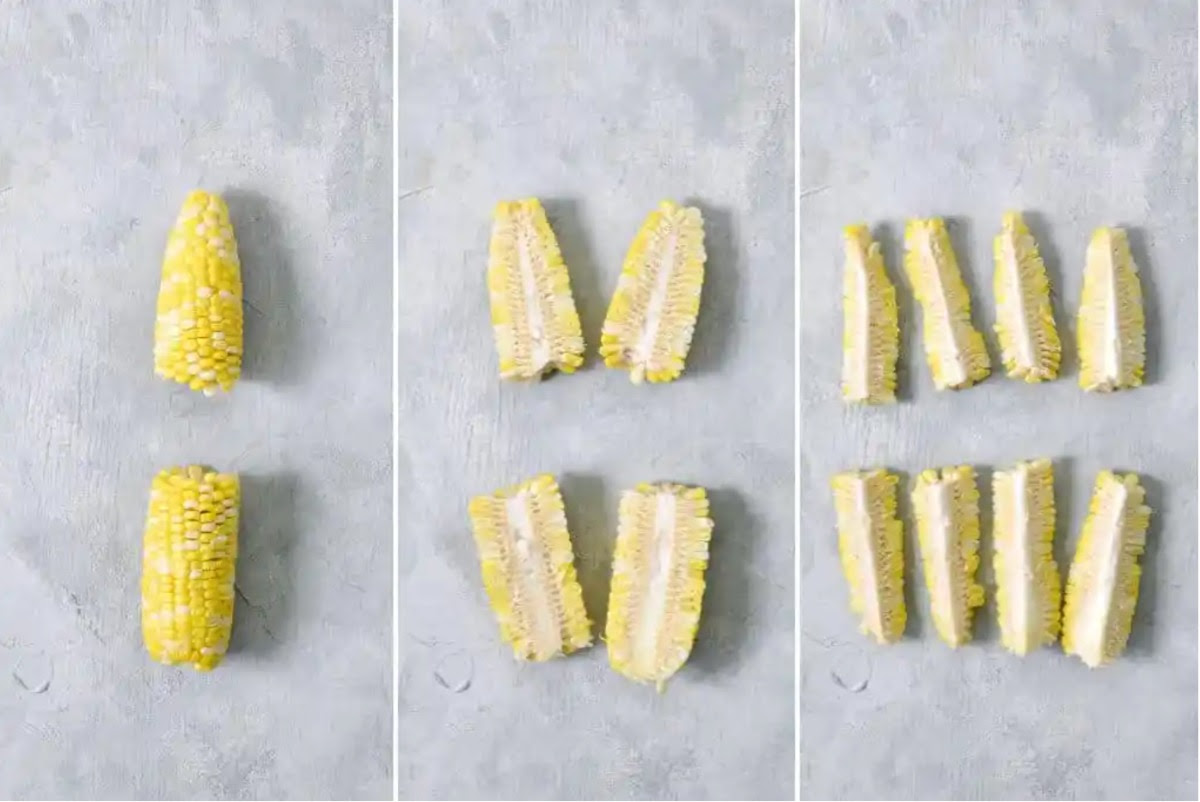
** WARNING: Be Careful When Cutting**
===
Corn Ribs
Ingredients:
4 ears of corn, shucked and cleaned
2 tablespoons olive oil
1 teaspoon salt
1 teaspoon garlic powder
1 teaspoon paprika
For the sauce:
3 tablespoons mayonnaise
1 tablespoon Sriracha sauce
A squeeze of lemon juice
Instructions:
Preheat oven to 400 degrees F (200 degrees C).
*TIP* Precook the corn for easier cutting. Bring a pot of water to the boil. Boil corn on the cob in boiling water for 4-5 minutes before cutting.
Cut corn on the cob into quarters lengthwise. Break in halves, then stand cobs up vertically to cut.
In a small bowl, combine olive oil, salt, garlic powder, and paprika.
Brush corn ribs with oil mixture.
Bake corn ribs in preheated oven for 22-25 minutes (or air fry for 15 min.), or until tender and crispy.
To make the sauce, combine mayonnaise, Sriracha sauce, and lemon juice in a small bowl.
Serve corn ribs with sauce.
Tips:
You can also grill corn ribs. To do this, preheat grill to medium heat. Grill corn ribs for 10-12 minutes, or until tender and crispy.
Corn ribs are a great way to use up leftover corn. Simply cut the corn on the cob into quarters and season it with the oil mixture. Then, bake or grill the corn ribs as directed.
I hope you love the recipe! Snap a picture and tag me @chefjoannas on instagram so I see how yours came out.
Enjoy!
Chef Joanna is a graduate of Le Cordon Bleu in Paris and a private chef for the stars. She also hosts pop up dinners and cooking classes inspired by her travels around the world. You can find more of her work at http://www.chefjoannas.com
Hi there, if you’re looking for a fun email each week like the one below, subscribe. Right now the emails are free. Cant wait to share some cooking tips and kitchen happenings with you!
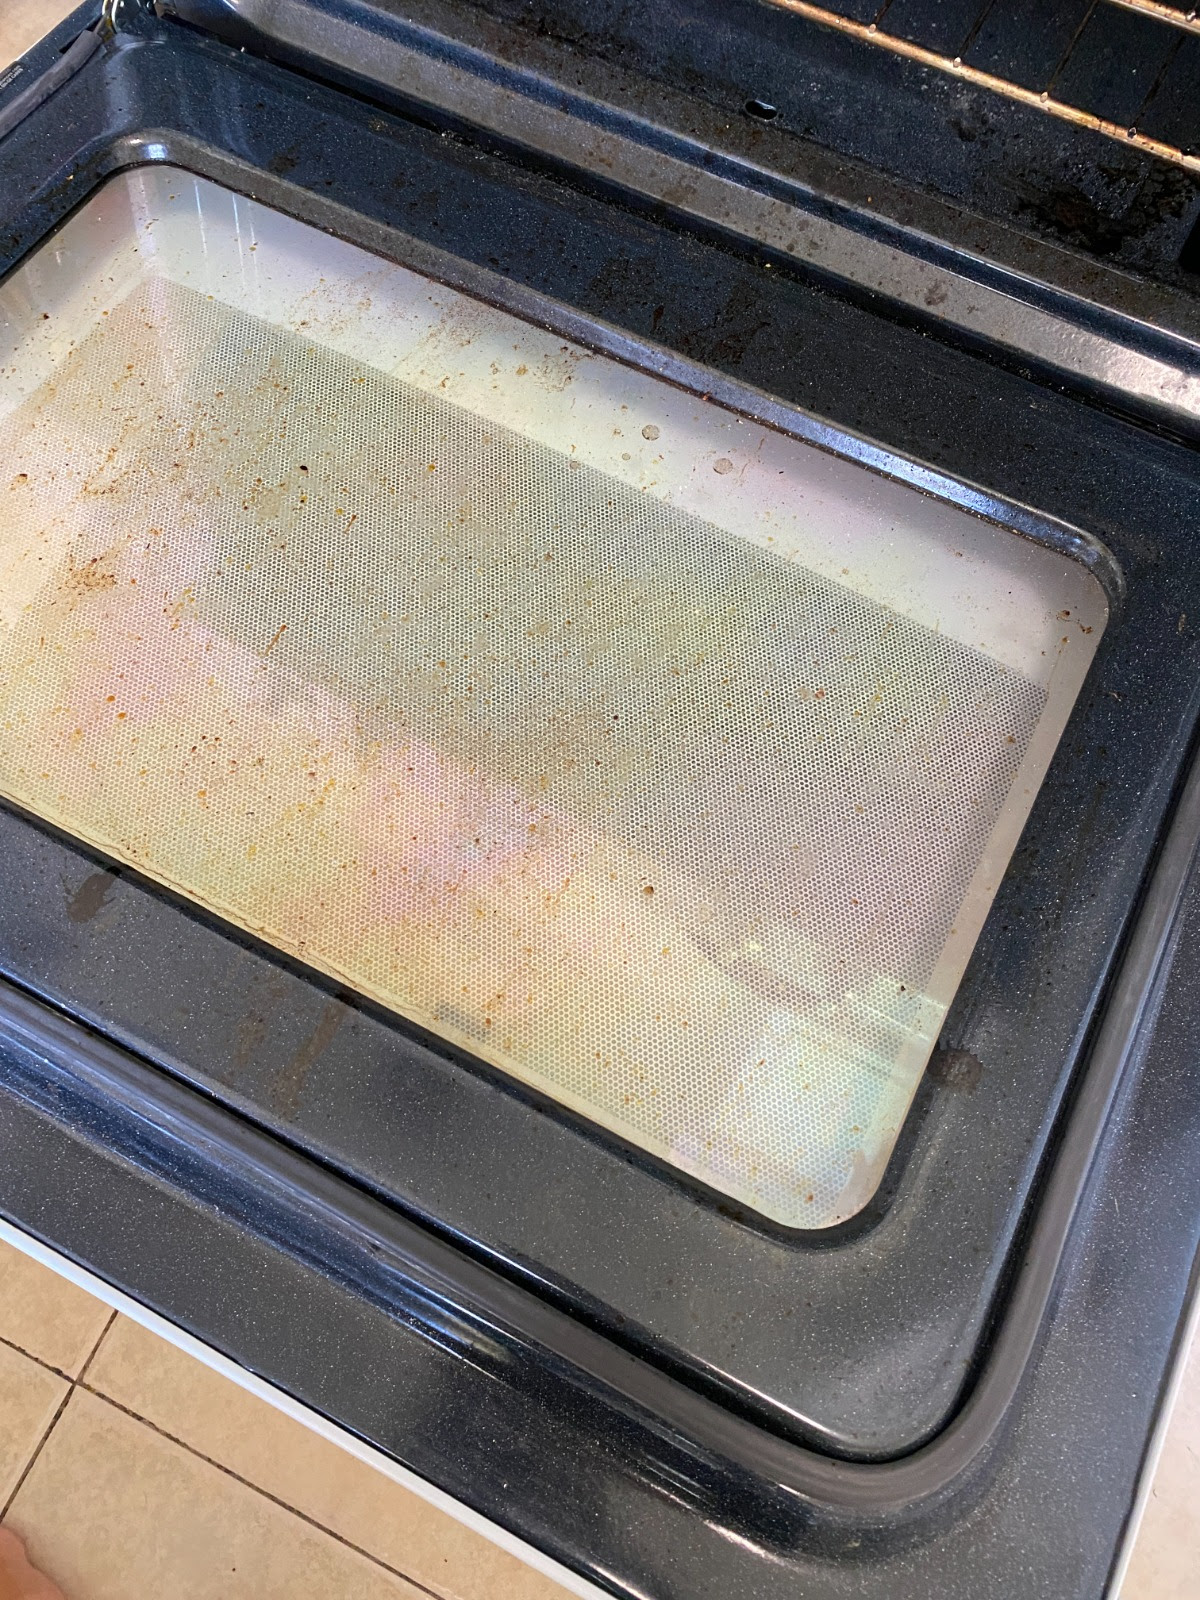
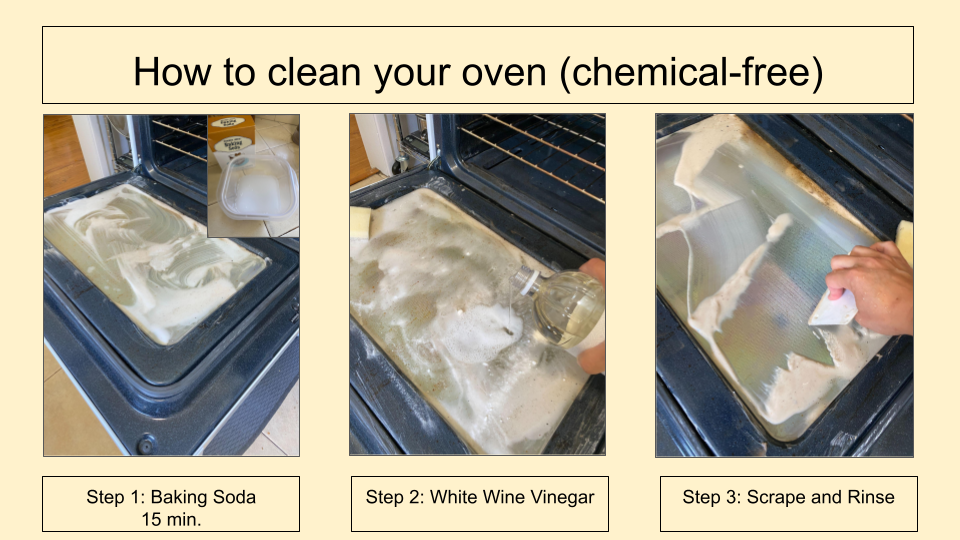
My new oven looks like it’s been through a lot even though it’s only a few months old.
But I’ve been hesitant to clean it because I don’t wanna use chemicals.
I think the residue could get into the food when the oven’s heated.
So I found a natural way to clean it using baking soda and vinegar.
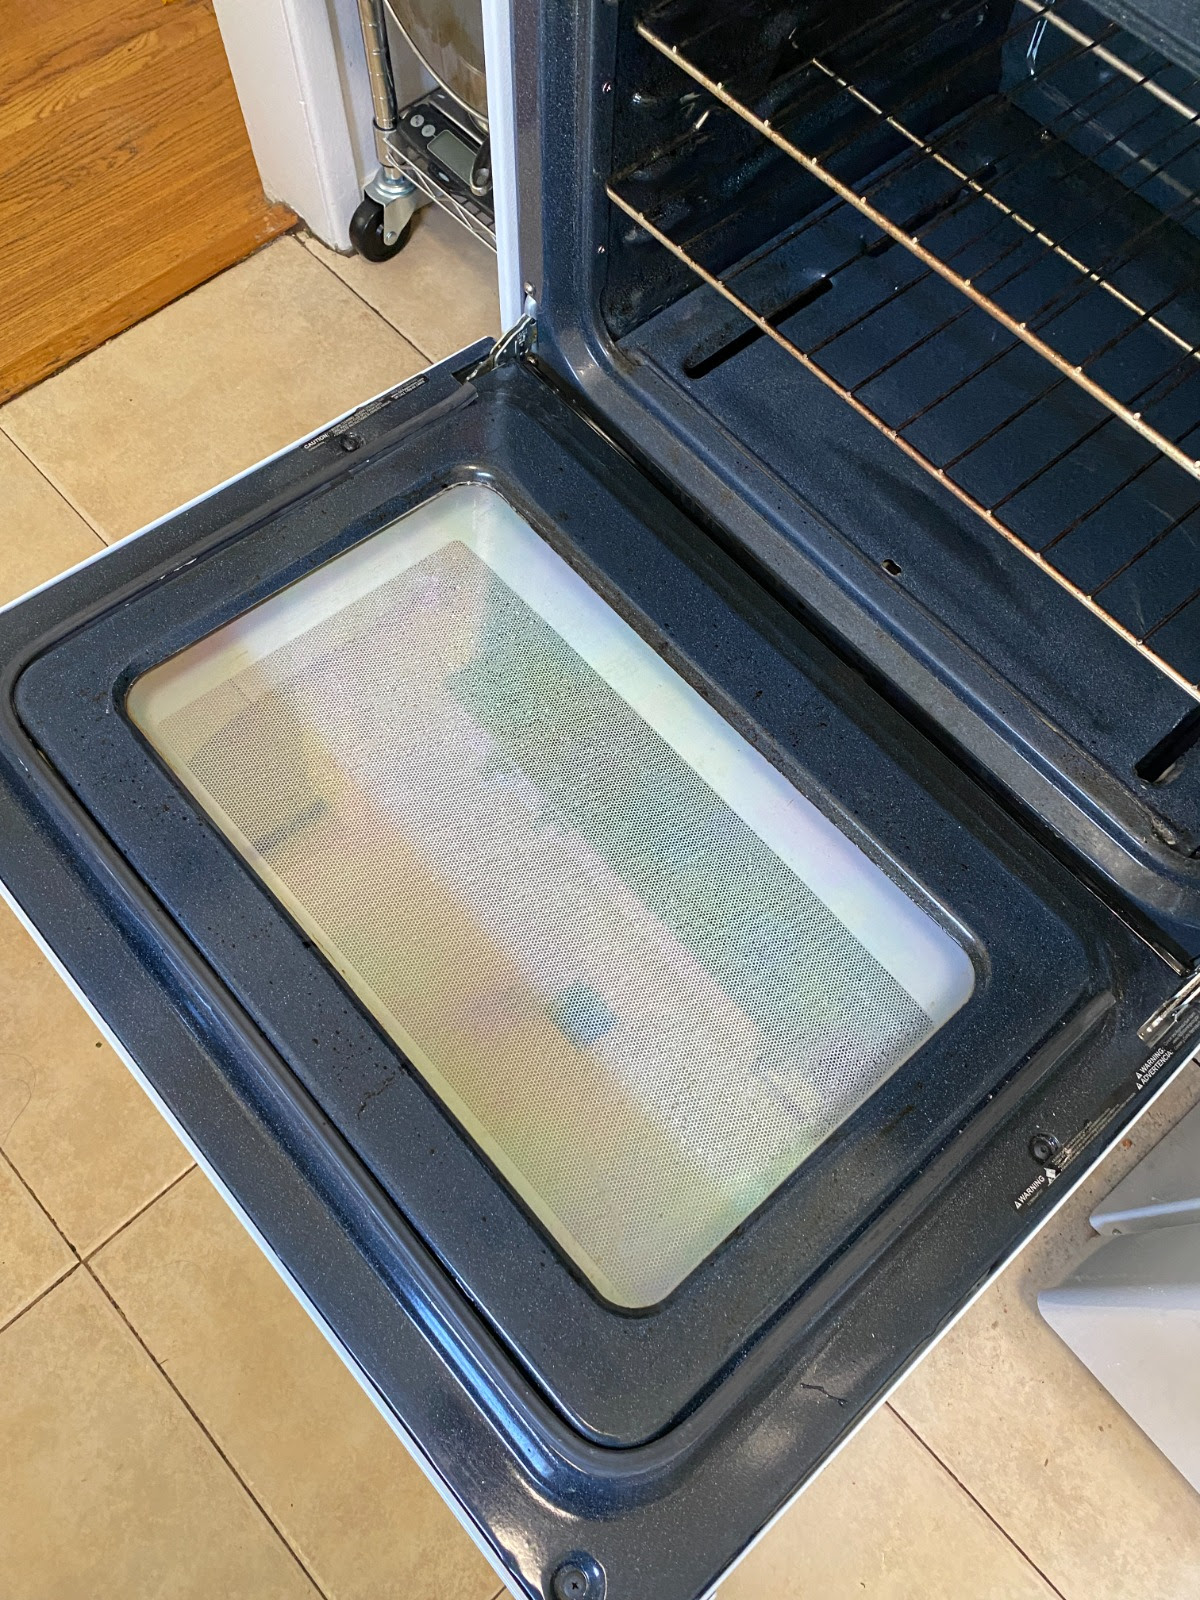
Below’s the before and after and then how you can do it too
Before
After
What you need:
Baking Soda (couple spoonfuls)
White Wine Vinegar (couple spoonfuls)
Plastic Scraper
Here’s how:
Make a paste of 1:1 baking soda to water. Just add enough water to make a paste. Then, rub that on the glass door for 15 minutes. Do this while the oven is cold.
After 15 minutes, pour a couple tablespoons of white wine vinegar on the door. It will fizz. Use a scraper to scrape away stubborn grease. Use a sponge as needed.
Then, use some waterto wipe it all off with a rag or sponge.
Inspiring:
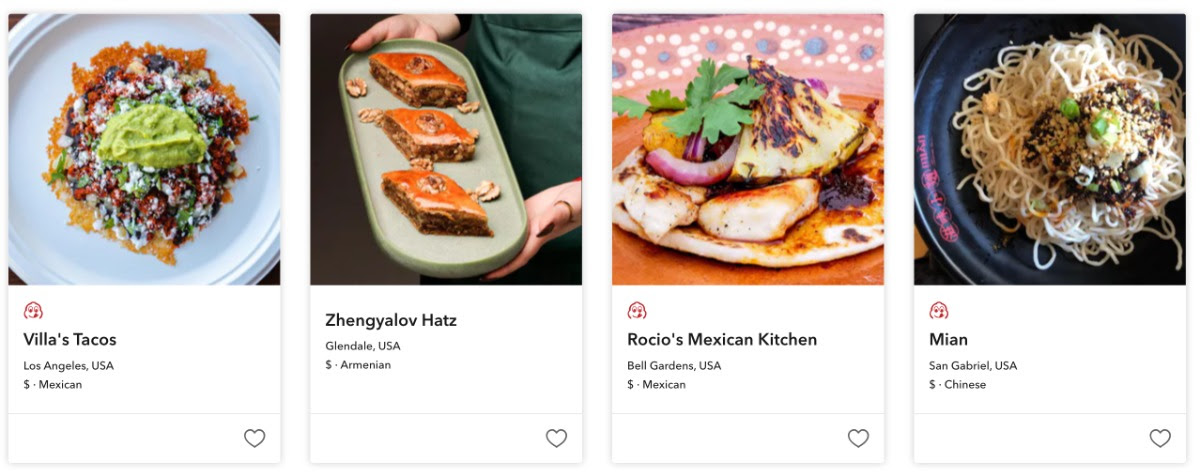
Have you heard of Michelin star restaurants?
If you don’t know, they’re some of the best restaurants in the world.
They’re places that you go to on special nights like anniversaries.
But I found out that they also have restaurants in their guide that are more affordable and every day.
All you have to do is go to the Michelin website and use the price filter.
I tried it and found 14 places in Los Angeles that I’m excited to try.
Here’s a behind the scenes look of the “One Night in Paris”dinner party.
.
The Inspiration
.
I’ll admit I just finished watching the show The Bear and it made me miss the fine dining industry. So, I wanted to do a classic French menu and give guests the most Michelin starred experience I could.
.
The menu was also an ode to my time spent in Paris some 10 years ago. Since finishing training in France, I spent more time cooking Italian and Mediterranean food over the years. But for this night, I wanted to take it back to the basics.
.
A bit more preparation goes into a French menu. It’s more technical but it’s satisfying when executed well. It took more time and preparation but we did it!
.
Thanks again to @groundsandcrumbs for helping with this more intensive menu. It was a success 🥳
.
Here’s the menu:
.
One Night in Paris
Hours d’oeuvres
Summer squash and ricotta tart
Ratatouille tartlette
Gougères
.
Amuse buse
Strawberry Champagne granita
.
Le Pain
Country sourdough
Raisin-walnut sourdough with orange
Rosemary Foccacia
Herb Butter
.
Salade
Salade with fine herbs
Apricot shallot dressing
Candied walnuts
Bleu Cheese
.
Plat Principal
Ribeye Steak frites
Potato purée
Assorted Vegetables
Shoestring potatoes
Sauce verte
Flower petals
.
Dessert
Crepes Suzette with orange butter
Profiterole with vanilla bean pastry cream and dark chocolate sauce
.
Petit Four
Lemon Shortbread by @groundsandcrumbs
.
If you want to join the next one, sign up to my email list here Subscribe Here
Thanks to Daryl for sharing this recipe for Tomato Fritters with me. 🇬🇷🍅
Check out our Live video below for the full recipe.
Save this recipe to try this summer. It came out really tasty.
It’s vegan, and you can use gluten free flour to make it gluten free.
Serve with tzatziki, hummus, olives, crudite or your favorite Greek dish to make it a perfect summer dinner.
Hope you enjoy. Original recipe from @recipesandplaces on Instagram
.
Tomato Fritters
Ingredients (makes about 15-20):
•300g cherry tomatoes, halved
•2 medium onions, small
Chop
•1 handful fresh basil, thinly sliced
•1 handful fresh mint, thinly sliced
•1 Tbsp. Salt
•Black pepper to taste
•1 Tbsp. Baking powder
•16 Tbsp. (1 cup) flour
Oil for frying.
.
Directions:
1. Add all ingredients in a bowl except the flour. Gradually add the flour, 3-4 Tbsp. at a time and mixing in.
2. Add just enough flour until the mixture is firm and you can mold patties with your hands. The batter will be sticky.
3. Heat oil in a shallow pan to pan fry. (You can deep fry but I wanted to use less oil) Use a nonstick and use less oil. Form small patties and place into oil when hot.
4. Fry both sides until golden brown. Then place on a wire rack or paper towels to drain.
*I suggest testing one patty first to adjust salt or texture.
Tomato Fritters
A naturally vegan Greek dish that's perfect for in-season ripe tomatoes.
Add all ingredients in a bowl except the flour. Gradually add the flour, 3-4 Tbsp. at a time and mixing in.
Add just enough flour until the mixture is firm and you can mold patties with your hands. The batter will be sticky.
Heat oil in a shallow pan to pan fry. (You can deep fry but I wanted to use less oil) Use a nonstick and use less oil. Form small patties and place into oil when hot.
Fry both sides until golden brown. Then place on a wire rack or paper towels to drain.
Notes
*I suggest testing one patty first to adjust salt or texture.
Woohoo! These healthier crispy rice tuna’s came out fantastic.
@daryls15 and I started cooking LIVE during the pandemic. But haven’t cooked together in a while! This was such a wonderful reunion. We used a really great recipe thanks to @rachlmansfield .
It came out great and I’ll be saving this recipe to make in the future. Thank you @daryls15 and @matt.hacker.184 for cooking with me! 🤗🍣 . Recipe: Healthier Crispy Rice Recipe!
Prep Time: 3 hours – overnight Cook Time: 15 minutes Total Time: 41 minute Yield: Makes about 20 pieces 1x
Ingredients
1 cup short grain rice or sushi rice ( I used calrose)
1 tablespoon coconut sugar
2 tablespoons rice vinegar
1 teaspoon sea salt
1 lb cooked crab sticks (or use sushi grade tuna or salmon!)
3 tablespoons mayo
1 tablespoon hot sauce
2 teaspoons coconut aminos, soy sauce or tamari
1 teaspoon toasted sesame oil
1 jalapeño, sliced (I used Fresno chile)
Toasted sesame seeds to garnish
Instructions
Place the sushi rice in a colander, rinse throughly and let it drain
Cook rice per instructions on package
While rice cooks, mix together rice vinegar, coconut sugar and salt in a small bowl
Transfer the rice to a large bowl then mix the vinegar mixture in the bowl
Line a baking sheet with parchment paper then spread the rice out across so it is about 1 inch high (or however thick you want it!)
Add the sheet to fridge to set for at least 3 hours. I like to do this overnight
Next prepare the fish topping but cutting the crab into smaller pieces then add in the mayo, hot sauce, coconut aminos and oil and store in fridge
Remove rice from fridge and slice the rice into 2 inch pieces
Thinly coat a large pan with oil and heat over medium/high
Gently add the rice squares to the pan and crisp until golden (don’t flip too soon or rice will come apart – I crisped bout 3-5 minutes on each side)
Drain on a wire rack or paper towel lined plate/tray
Top the crispy rice with the crab, jalapeño and sesame seeds and enjoy!
I’ve been trying to get this sourdough foccacia down for years. A lot of times they end up dense and not fluffy.
It turns out, the secret is to give it enough time.
Here’s my process that works:
I give this loaf a total of 72 hours to ferment in the fridge. That means I start on a Monday or Tuesday and it’s ready on Friday. It’s in the fridge Tues-Fri. I take it out Friday morning, stretch it and let is rise. Then, it’s ready for the bake.
The beauty is when you let the dough rest in the fridge a few days, it ferments and is easier to digest. A lot of people with gluten intolerances can eat bread like this. It’s healthier for the gut, too.
So, when in doubt, stick it in the fridge (cover well with plastic). The dough may darken a bit sometimes, but it’s fine. I wouldn’t go over 1 week.
Not only do I give it time to ferment, but I gave it more time to rise in the final rise, too. I used to rush it, waiting just an hour.
Unlike my original sourdough loaf that I bake straight from the fridge, I let this dough sit in the baking pan 2-3 hours at room temperature to let it rise. (Depends on the temperature outside). It was around 65F outside.
Only once it’s really risen I dimple it (my favorite part) and bake.
Extra notes:
I haven’t tried it with rosemary yet but I know it will take it to the next level. It’s delicious.
Be sure to use top quality extra virgin olive oil since it imparts flavor in to the dough and gives it more character.
See video at the bottom of this post for more visual instructions.
Sourdough Focaccia
Ingredients (makes one 13″X9″ loaf):
100g sourdough starter (active)
390ml slightly warm water
15 -20ml (1 tablespoon) extra virgin olive oil
10g (2 teaspoons) fine sea salt
500g white bread flour (12% protein content or higher) (I used 100g whole grain and 400g bread flour)
To assemble:
45-60ml (3-4 tablespoons) Extra virgin olive oil
flaky sea salt (generous sprinkle)
Rosemary sprigs (or toppings of choice)
Instructions:
1. In a large mixing bowl, whisk together the sourdough starter, water and extra virgin olive oil. With a large spoon, stir in the fine sea salt (don’t whisk…once you add salt, the mixture tends to stick to the whisk).
2. Mix together and put in fridge for 1-3 days. Then take out and fold a couple times for a couple hours if not too hot out one of those days. Put back in fridge.
3. In the morning stretch into a 13×9 greased baking sheet or pan with parchment. Let rise 2-3 hours but cover well with a lid, or top, to prevent from forming a skin.
4. After it’s risen, gently put some olive oil and poke holes with fingers. Do it gently to not let all the air out. There should be some nice air bubbles.
5. Then bake in the middle rack for 20-25 minutes at 430 F.


 Elote Inspired Corn Ribs